Mockup Your Manga Story and Pages
Mockup Your Manga Story and Pages
Now that your manga story script is ready, the next step is to translate this script into a set of pages with panels and scenes. This is the role of the manga mockup to help making that transition, preparing the final visuals of the manga.
The mockup of the manga (also called ネーム – nēmu in Japanese) is more than just a storyboard that translates each line of a script into panels with drawings and dialogues.
This article will guide you in the process distinguishing two levels of mockups:
- Story mockups, which ensure the proper flow of the story over the pages.
- Page mockups, which ensure the proper flow of the content of a page’s panels.
What is the difference between a manga mockup and a storyboard?
The Japanese word ネーム – nēmu, also pronounced name in English, is generally translated as storyboard. But many people, like myself, use the term manga mockup as, with a closer look, we can see that a nēmu goes far beyond storyboarding.
A storyboard is the translation of a script into a set of images that show how the different scenes of an anime or movie could be shot. They are generally showing the characters and actions through the eyes of some camera. If we relate to manga, this corresponds to the creation of individual panels.
But what a storyboard lacks, and which is brought by the nēmu, is also the layout of these panels onto pages. The objective of the manga mockup is not just to determine how to translate the script into images, but also how to position these images on pages.
The manga mockup will aim first at fitting the content into the targeted number of pages. And it will also aim at looking what size, position and content can each of these panels have on the pages for the best effect.
Story mockup
Creating a story mockup template
The way a story mockup is generally made is by taking a large sheet of paper, like A4 or Letter printer paper, and splitting it into 4 or 6 cells of approximately equal size. Then each cell is itself split into two and will represent a couple of pages like you would see with a manga opened in front of you.
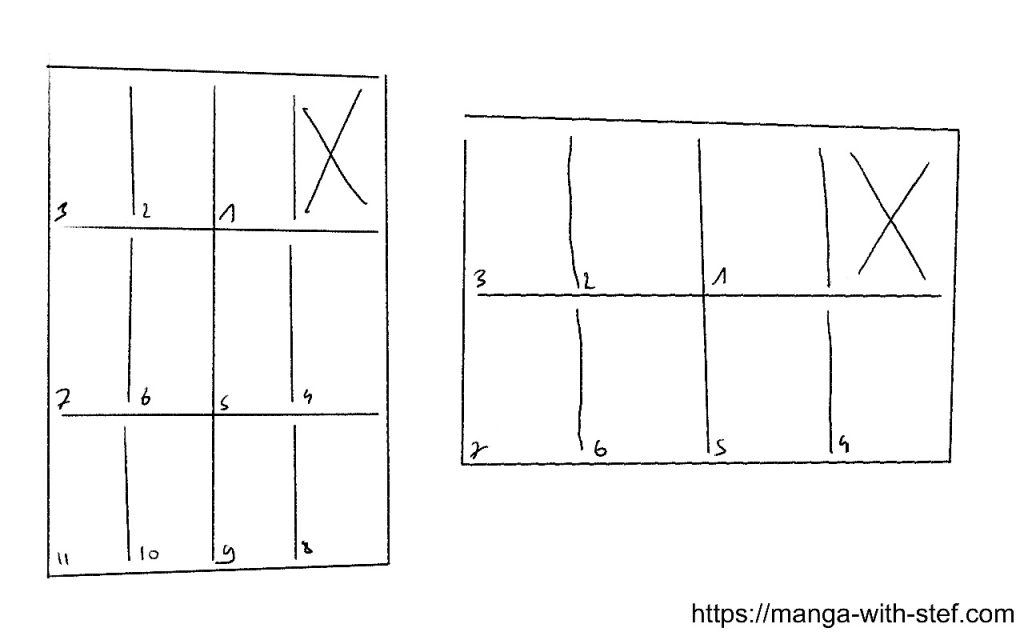
You have to have as many pages as the number of pages targeted by your chapter or story. Therefore either around 40 for a first chapter, 20 for a standard chapter or 60 for a short story.
Take care also that at the very start of your manga you just have one page. The other one is the back of the cover. This is why this very first page is marked with a big “X” in the mockup.
Objectives if the manga story mockup
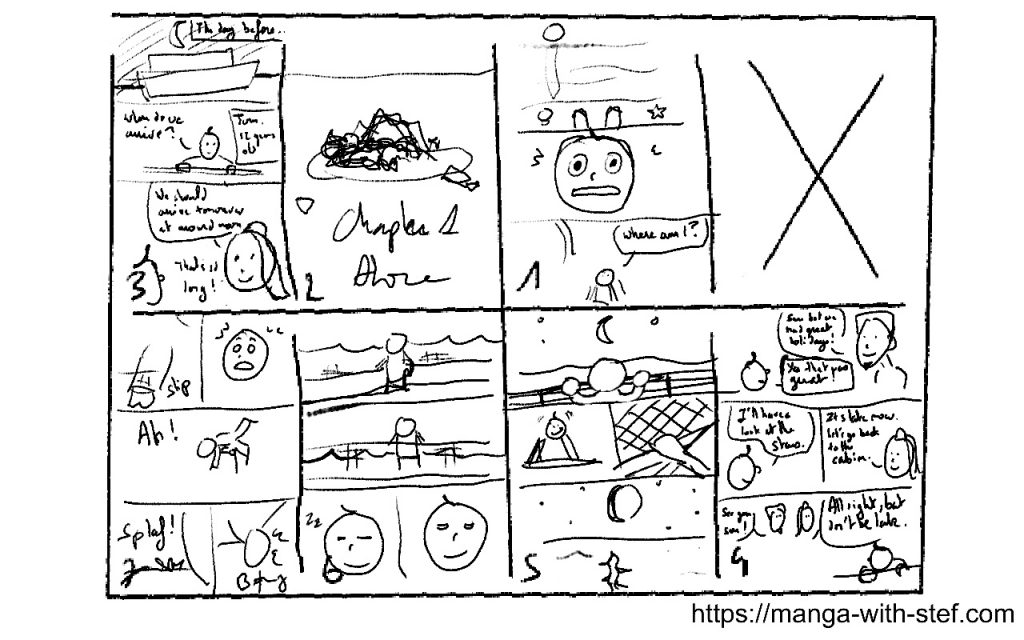
Once you have your template ready, the next step is to start drawing your manga story. This is where it really starts to get exciting as the story is moving towards its final shape.
The purpose of this stage is first to translate the different lines of the manga script into panels with characters, settings and dialogues.
Then, the second objective will be to fit the story into the desired amount of pages. This might require expanding, adding or removing panels. And you might even have to review your script to make things fit.
The last objective will be to use page turns to best catch the attention of your readers. Create expectation on the front of the page, and do the reveal on the back of the page to create surprise and excitement.
Mocking up your story
A manga page contains between 3 and 6 panels on average. Therefore if most of your pages only contain 1 or 2 panels, you might in the end lack some dynamics. And if most of your pages have 7 or more panels, it will start to be really dense. This might wear out your readers with too many pieces of information or details.
At this mockup stage, manga artists generally don’t go into too many details. Some artists will just draw enough features to make the characters and the actions recognisable. At times they might just put minimum information, like a circle with a name or initials in it.
Reviewing and reworking the story mockup
The next stage will be to proof read the story mockup. This can be done by the scenarist if you have one, an editor, or a friend.
This step is important. The objectives are to:
- Check that every elements are in place, the characters, their actions, the different pieces of dialogue and narration…
- Make sure that these different pieces fit and flow correctly without being too crowded or too diluted.
- And make sure that the attention catchers are at the proper place as mentioned above.
If this isn’t the case, a first option will be to add or remove some panels, or to move or resize some others. And again, you or your scenarist might have to review the script. This might mean re-adapting the flow of the actions, dialogues and attention catchers. This might also be adding content, or splitting a chapter into parts…
In a professional publication process, the editor will also contribute to the work by sharing his/her feedback on the story mockup, again leading to potential additional rework. As an amateur, you can also of course have the mockup be read by friends or family members to get their feedback.
Page mockups
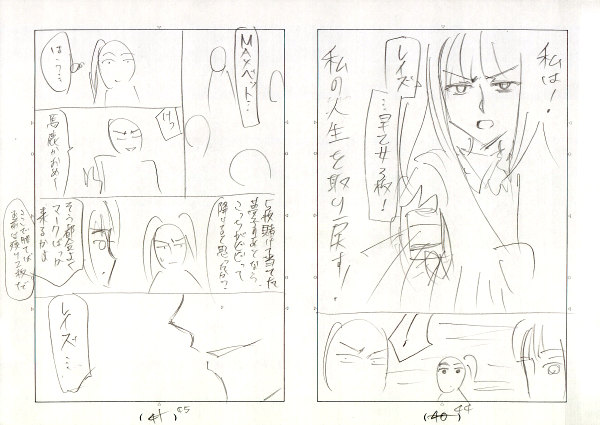
Once the story overall layout is set, the next stage is to refine the layout of each pages themselves. This is the objective of the page mockup.
The intent is here to shape the final flow of your panels and their content. Focus will be given on the shape of the panels. This is here also that you will refine the manner to highlight key moments of the story. As indicated this can be characters going over the edges of their panel, or full page and double page content.
The page mockup could be optional if you don’t plan to use fancy panel shapes. For instance if you go for a basic layout of rectangular panels on multiple lines, the story mockup might be sufficient. But if you want to go with a more complex layout, with different sizes of panels, slanted borders… then this might be essential to do such mockup to test that your content fits and flows properly.
© Homura Kawamoto, Toru Naomura / SQUARE ENIX
Here you can use either one sheet of paper per page, or for a double page (like the example above).
Remember though that this is still a mockup, and that therefore the level of details is expected to be just sufficient to understand what’s going on.
Panels
Panels and their layout will give the global dynamic of your page.
Larger panels attract more attention and are dedicated to big moments. The bigger size of the panel involves more details and will take more time to be scanned by the reader. This also implies a longer time lapse in the flow of the story, or a pause.
Smaller ones are for secondary actions or to focus on slight transient details. This is for instance a hand shaking and indicating the nervousness of a character. A quick smile that indicates the contempt of another one. A cloud passing…
The flow of your panels should also be clear for the reader. In a manga, readers do by default scan panels horizontally (from right to left) from top to bottom. This flow will be guided by the size of the gap between the panels. Smaller gaps being more easily crossed by the reader’s eyes than larger gaps.
You can also introduce slanted borders to add some dynamic to your scenes. This can create some specific sensations like simultaneity, opposition or domination.
Have a look at the sample page below for instance. You can see how gaps between panels on a line are smaller that horizontal gaps between lines to guide the reader’s eyes. Also, the use of two panels on the row height with a slanted border in the middle row adds a sense of simultaneity to the content. And the bottom row with its small panels and inclined borders creates tension and dynamics.
One Piece © Eiichiro Oda / SHUEISHA Inc.
You can find more details on that part in my article on manga panelling.
Text bubbles
Artists will also start to work on the positioning of the text bubbles. The objective will be to make sure that the reader does not read the bubbles in the wrong order.
Within a manga panel, readers scan bubbles vertically from right to left.
It isn’t a good idea to change that order, but if you do it make sure that you keep it consistent throughout your manga. Once the reader has taken the flow it should not change, otherwise this will frustrate him/her.
One Piece – © Eiichiro Oda / SHUEISHA Inc.
Again, you can find more information on that part in my article on speech bubbles layout.
The characters and settings
One objective is also here to define which framing will give the best impact for your scene. You can use the rule of thirds or alternate techniques for instance to position your characters and key settings elements.
The objective is once more to ensure that your readers will be able to properly understand the scene. You have to make sure that key elements are quickly identifiable, and that secondary elements will not bring distraction.
This is really here that your artistic style and experience will start to show.
Reviewing and reworking the page mockups
Here again, the scenarist, the editor or a friend shall proof read the page mockups to make sure things flow properly.
The objectives are the same a before: check that things are in place and flow correctly. Any remark or hesitation shall be taken into consideration.
And here also this might lead to reworking the content and reiterating the process.
Final Words
Overall, though the mockup process is not complicated, it can take time and multiple iterations for you to get something satisfying.
But as I indicated in a previous articles, reworking a script or a mockup is better than having to redo fully inked pages. The effort required to rework a script or mockup is far less time consuming than to revise or redo a final drawing. And this is key if you don’t want to wear you off.
Do not hesitate to ask questions or to share your comments. Also do not hesitate to like and share.
See you,
Stef