Workflow and Equipment for Making a Manga
Workflow and Equipment for Making a Manga
Making a manga, likewise for a movie or a book, follows a specific workflow. It starts with the outlining and scripting of the story. Then it continues with the creation of mockups, the sketching, inking and shading / colouring. And it ends the publication of the manga.
This article will detail the stages of this workflow and the equipment used during the different stages.
Working Alone or as a Team
The realisation of manga requires knowledge in two domains of competencies: storytelling and artistic.
The storytelling focuses on the literary aspect of the story. It describes the settings, the plots and intrigues, as well as the dialogues. This is the part that sets the pace of the story to make it interesting.
The artistic part focuses on the visual identity of the manga. This includes first the character and world design. Then this includes the realisation of pages of the manga. This part consists in translating the story into panels while ensuring proper pace of the story over the pages.
These two competencies are really different, and it isn’t easy for one single person to master both of them. Moreover, the related activities are time consuming and difficult to handle alone. This is the reason why it is quite common that two persons team up for the realisation of a manga. One of the two persons will have storytelling competencies and manage the storytelling part. The other one artistic competencies and manage the artistic and realisation parts.
In professional setups, you might also have an editor who acts as the voice of the readers (and the publishing company) and ensures that the manga fits the targeted audience by proofreading and advising the scenarist and artist. Artists might also hire some assistants to help them in the realisation of the manga pages.
Manga storytelling and characters design
Given you have an idea, the first step in the realisation of a manga will be to outline your story. This step will allow identifying the main stages and key milestones of the story. This from the start to the end of the story. The objective here is to make sure you have the right amount of content for your story. This means not too much, and not too few. And it also ensures that your story has a path to follow and a destination to reach. This will avoid the story getting out of control and becoming incoherent.
Then the next stage will be the character design. This consists at first in defining the physical and mental features of the main characters and in giving them a past. And then, start defining character arcs, which will indicate how the characters will evolve along the story.
Once you have your outline, your characters and characters’ arc, the next stage will be to script the story. The script will detail the outline, like a novel. It will detail the settings, the actions, emotions, dialogues… In the end it will define the content of each page of your manga. Note that in a series, though, this description is only made for the 2 or 3 newt chapters. This gives sufficient visibility to start drawing your pages. But this allows also avoiding huge rework of the content in case you have to revise your story following readers’ feedbacks.
All that part requires little supplies. You can write your outline, script and characters design in a standard notebook.
The story and page mockups
Along the storytelling part, you can also prepare the graphical design of your characters.
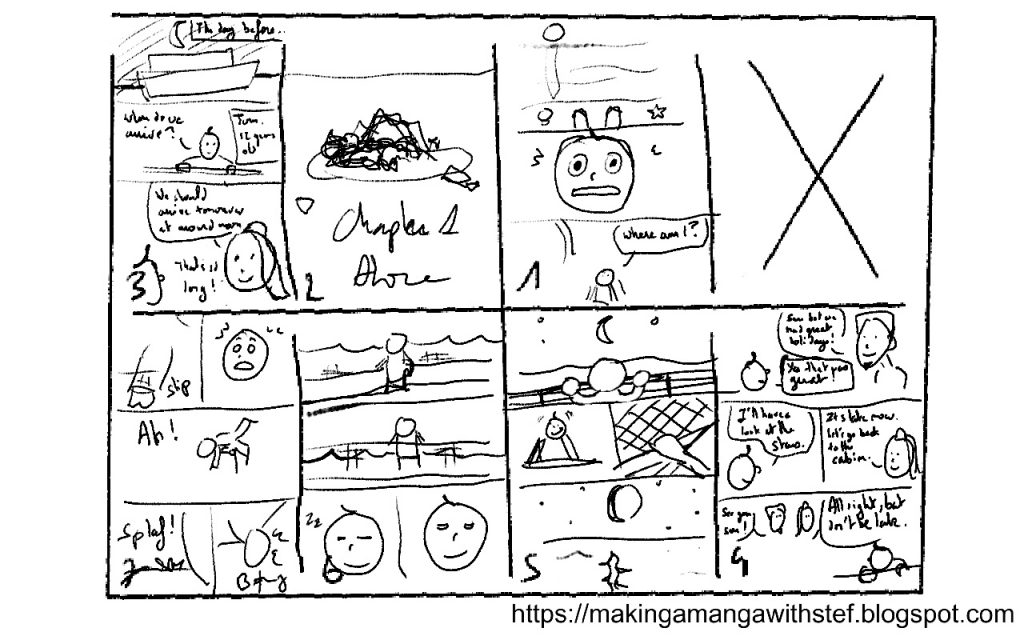
Then, once the storytelling part is ready, you can create a mockup of the story or episode. This part is called ネーム (nēmu) in Japanese.
This consists in translating the script into draft of the manga pages with their different panels and content. The objective is to make sure that the story works when drawn.
You can do this part in two stages. First with a rough mockup of the story or chapter ensuring that the content of the script fits within the defined number of pages. Then on a page by page basis to fine-tune the panels’ layout and visual impact.
You might have to revise these mockups multiple times to ensure the story flows correctly and that the graphical impact is be good.
Here again, this stage requires little supplies. You can again use a notebook or printing paper. Use pencil to make it easy to rework your content.
The Drawing Stage
The drawing stage is breakdown into 3 sub-stages:
- The sketching
- The inking
- The colouring / shading
Sketching
Once you have finished your page mockups, you can move to the drawing stage. You are here preparing the final stage, everything you draw now is going to end up in the hands of your readers.
Following the mockup, you will sketch the pages in details. This includes panels, characters, settings, text bubbles, onomatopoeias and speed lines.
Sketch your pages on large sheets of paper, like B4, A4 or Letter, to ease drawing details. You will downsize the page later on for publishing. Depending on how you intend to ink your drawing, you can use either graphite pencils or non-photo blue pencils.
Inking
The inking process consists simply in going over the sketch of the previous step with ink.
You can use different techniques:
- Ink over your sketch. Then you will have to erase your sketch if you used graphite. You can keep your sketch under the inked drawing if you used non-photo blue pencil.
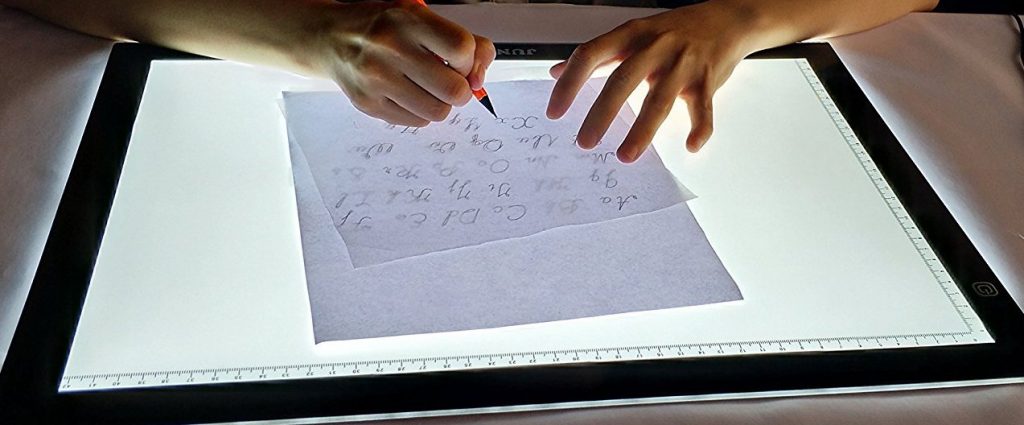
- Ink on a new sheet of paper using a light table to copy your rough sketch,
It was the tradition in Japan to use dip pens and China ink for the inking stage. The most used nibs being the G-Pen for heavy strokes, and the Maru-pen for lighter strokes and details.
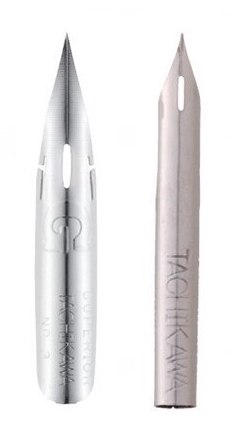
G-Pen and maru pen kit from DELETER
The China ink you use will depend on whether or not you intend to colour your drawing, as the use of some paints or alcohol markers can make your ink bleed. Therefore if you don’t colour your drawing, any ink will do, but if you colour it you will have to look for water or alcohol resistant inks (Pilot Security Ink and Kuretake Sumi ink 60 are reputed to work well for alcohol markers, and Nicker Comic Ink Water Proof Black and Tachikawa Jet Black inks are reputed to be both alcohol and water resistant).
Nowadays, though, many manga artists will use more standard ink pens. Many artists use fineliners which provide specific line widths. But you can virtually use any black pen you have available. Be careful and make some tests if you intend to colour your drawing. Make sure your ink will not bleed. Good fine liner brands to use with alcohol markers and watercolours will be Copic or Micron. You can find my reviews and tests in this article: Fine liner ink pens review.
In addition to pen, you will surely need rubbers to erase pencil strokes, and liquid eraser or white paint to hide any undesired traces of ink.
Shading / Colouring
Once the inking is done, the last step for the artist is the shading / colouring of the page.
For black and white pages the shading can be achieved through different techniques:
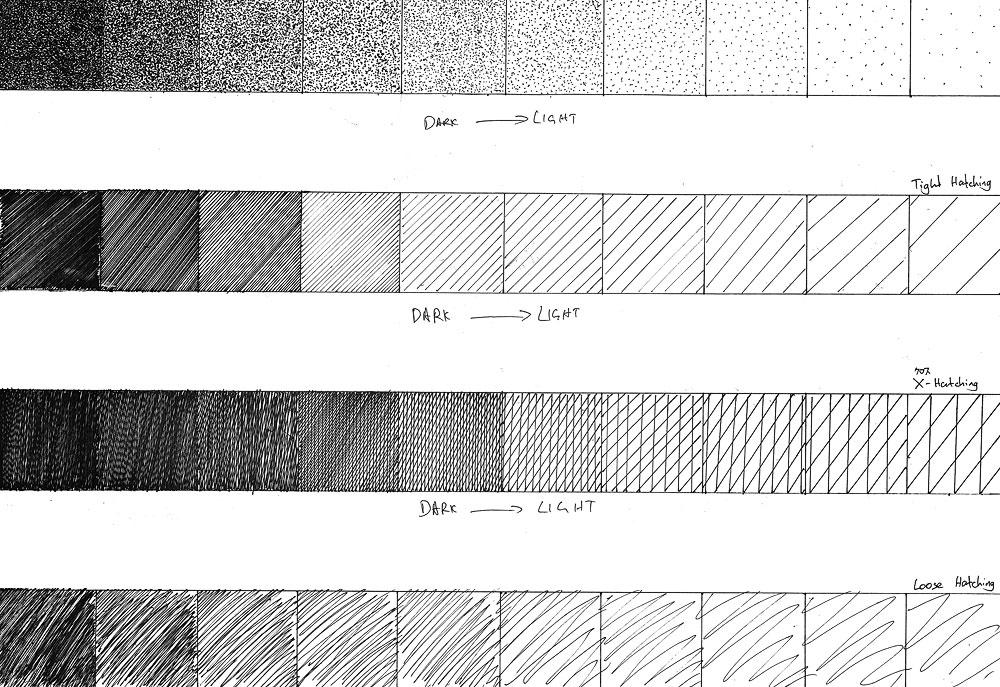
- Hatching: this consists in using a pen to draw thin parallel or crossing lines, or dotting which consists in creating patterns of thin dots, with the objective of creating different light / dark shades.
- Screentones: Screentones are ready made dot or line patterns. Screentone paper is applied on the areas to be shaded using pressure to make it stick to the drawing, like some kind of tape. The screentone surface can also be scratched to created gradients or other effects.
- Using a computer software, like Photoshop, Clip Paint Studio, Krita (free) or Medibang Paint (free), which offer digital half-toning / shading capabilities.
Speaking of computer software, more and more artist nowadays start to use these pieces of software for their sketching and/or inking processes too, using graphic drawing tablets or tablet computers.
When an artist wants to colour a page he might use:
- Alcohol markers (Copic, Promarkers…),
- Paint and watercolour.
- Coloured pencils
Artists are also using more and more frequently computer software for that part nowadays.
Publication stage
Once the shading / colouring is complete, the pages will then be published.
In a professional context, pages are sent to the editor for final review before they are printed.
Conclusion
As you could see, once you have a story and characters, you can easily get started in the realisation of your pages. You can do everything with standard office supplies like a notebook, printing paper, pencil and ink pens.
You can of course try dip pens or computer software, but not having some or knowing how to use them is not a stopper.
What does the scenarist do during the realisation phase?
If you are wondering what the scenarist does during the time the artist spends sketching, inking and shading / colouring, the scenarist will generally be working on the scripts for the next episodes and do some proofreading of the pages.
Working in parallel on the script and on the drawing is required to achieve a smoothly deliver the episodes. And more so when you are due to provide new content every week.
The proofreading is also essential to spot any realisation mistakes and correct them as early as possible in the process.
That’s it for this article. Do not hesitate to share your feedbacks and questions 😉
In the next episode, we will see how to come with ideas.
See you!
Stef