How to Digitise Your Manga Page Drawings?
How to Digitise Your Manga Page Drawings?
Digitisation is the process of transforming your drawings into files on a computer. It can be performed different ways, but some techniques are better than the others. Here I will introduce the different steps to digitise a manga drawing using either a scanner or a camera. I will also describe how you can post-process your images to get optimal results.
Using a scanner to digitise your manga pages drawing
If you have a scanner available, then I would advise you digitise your manga drawings using it. It will make you save time when compared to using a camera.
A scanner is designed to digitise sheets of paper. It ensures that the drawing being digitised is not being deformed by preserving proportions, angles… and is homogeneously lit. Moreover digitisation software that come along with scanners include some image post-processing capabilities. They will ease some operations like making an image black and white, tuning contrast… This will allow getting the final result more quickly.
Here is the general steps to scan the drawing of your manga pages:
- Remove dust from your page and from the scanner window. Many people forget this step and later spot myriads of dust specks on their scanned page.
- Select a profile adapted to the content of your page:
- black and white or grayscale for a rough sketch made using a graphite pencil or for an inked / screentoned drawing,
- colour for a coloured page or for a page containing blue or red rough sketch lines
- Choose the scanning resolution for your image. 300 dpi is the standard resolution used by many drawing and publishing software. But make sure to check which one your editing or printing software is using. MediBangPaint, the software I will be using for demonstration in this article, uses a resolution of 350 dpi. And in case you don’t have a clue on this point, go for 600 dpi. It is better to have more pixels and to reduce the size of your drawing. If you were to find out later on that the resolution is too low, you will have to perform the operation again.
- If the option is available, optimise the contrast of your scanned image to make blacks and white pop out.
- Finally, launch the scan operation.
The next step will be to control the scanned image content and to process it (more details after the next section).
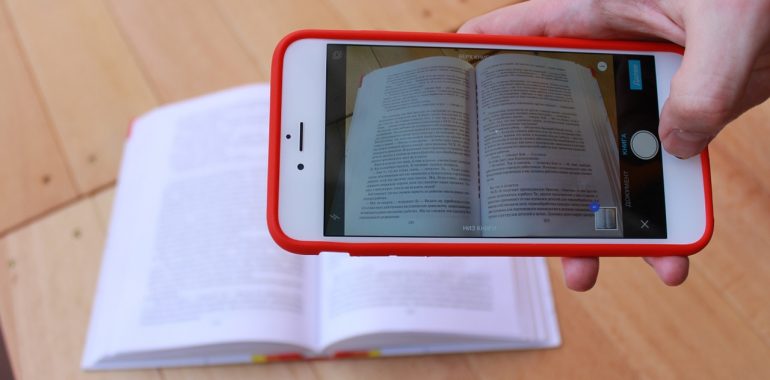
Using a camera to digitise the drawing of your manga pages
Digitising your manga pages using a camera will be a bit more complicated. It will require additional precautions and additional steps when compared to using a scanner.
The first issue you will encounter is image deformation. This deformation can be due to the camera lens and to the angle the camera makes with your drawing. Then the paper warping and lighting will also introduce some colour variations that you will have to correct.
Here is the general process:
- Lay your page flat on an opaque surface to prevent any backlighting.
- Remove any dust from your page.
- Light your page as uniformly as possible to reduce light fading and shadows.
- Position the lens of your camera at the centre of the page you want to photograph. And try to be parallel to your page in order to limit deformations.
- Move the camera at a distance that allows you to frame your page with a small space around it. You should be able to see the borders and corners of your drawing on the picture. This will ease correcting deformations and cropping later on.
- Also, ensure that you are not casting shadows with your camera when taking the picture.
If you have the choice between multiple cameras, use the one with the highest pixel resolution. This will allow you to capture the maximum of details.
Then, here also, the next step will be to control and correct your image.
Controlling and correcting the pictures of your pages
Here, I will explain what kind of post-processing you might have to perform on your images. I will also introduce how to do perform this task using MediBangPaint. I chose MediBangPaint as it is a free app/software available on most common desktop and mobile platforms.
The controls and post processing stages will depend on:
- the digitisation technique used,
- the type of drawing you digitised (rough sketch, inked sketch, coloured sketch…).
For a scanned page, you might just have to:
- correct the rotation
- perform some cropping
For a photographed page, you might have to:
- Correct deformations
- Correct lighting
- Change your image into a black and white image.
Finally, if you have used a blue or red pencil to make your rough sketch, you will have to remove the blue or red pencil.
Opening and checking the image of your digitised page
I will guide you using MediBangPaint but you can do it using other image edition software (Gimp, Clip Studio Paint, Krita, PhotoShop, PaintShopPro…). The advantage of MediBangPro is that it is available on most common platforms (Windows, Mac, iOS, Android).
Open your image in MediBangPaint as follows:
- First create a new file of the desired size (matching the size of your scanned page, like: B4, A4, Letter… as well as the desired resolution) using the File > New… menu item
- Then import you scanned image using the File > Open the image as a layer… menu item, and it shall appear on your screen.
Points that you have to check are the following:
- Rotation (in case of scanned images) or deformations (in case of photographed images)
- Cropping / Resizing
- Removal of blue / red sketch lines
- Dust spots
- Contrast and colouring in case of a photographed image
You can display the grid in MediBangPaint to help you controlling for rotations and deformations by selecting the View > Grid menu item.
Correcting rotation of your digitised manga page
Checking for rotation issue can be done by using the grid or by aligning a vertical or horizontal line of your scanned drawing with the border of a window or the border of the screen. If these do not align, then the rotation of your image will need to be corrected.
Using MediBangPaint this can be done as follows:
- Open the Select > Transform menu item, this will surround your image with some handles and show a menu at the bottom of your page.
- Left-click outside of your picture and drag your mouse cursor to rotate your image.
- Release the mouse button when at the desired angle, and then click the OK button in the bottom menu to validate the operation.
If after aligning one side, you find that the other one no longer fits (and if these were correct on your drawing), this means you have a deformation issue.
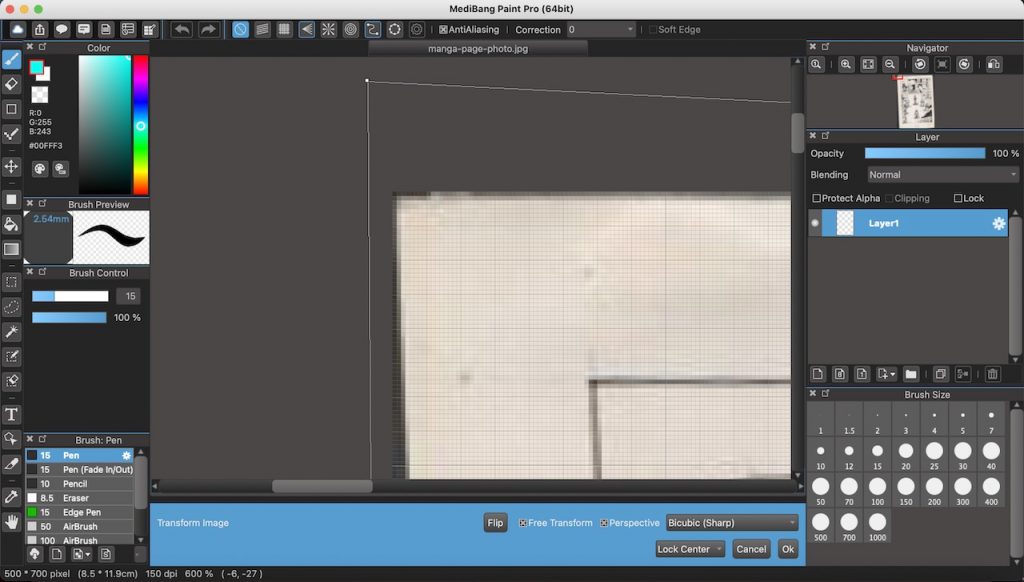
Correcting deformations of your digitised manga page
Correcting deformations is a bit more complex. It will require aligning the four corners of your page in the picture with the four corners of the image in your image editor.Using MediBangPaint this can be done using the transform tool:
- Open the tool using the Select > Transform menu item. Handles will show on the corners and borders of the image.
- Make sure that the Free transform checkbox is selected in the transform menu at the bottom of the screen. This option will allow you to independently move the corners of the picture.
- Using the grid and the outline of the image border, move the corners of your picture by dragging the handles in the corners of your picture to align the corners of your page with the corner of the image.
- Once you are satisfied with the correction of your page, click on the OK button to validate the correction.
Cropping / Resizing
Cropping / resizing can be needed if the corners of the scanned image of your page are not exactly at the corners of the image and gaps show around the edges.
Using MediBangPaint this can be done as follows:
- Open the Select > Transform menu item, this will surround your image with some handles and show a menu at the bottom of your page.
- Make sure that the Free transform checkbox is unselected in the bottom menu to allow uniform transformation of your picture.
- Left-click one of the handles on. a side where a gap is showing and drag the handle so that the border of your scan page aligns with the image border and the gap disappears. Repeat the operation for each side showing a gap.
- When done, click the OK button in the bottom menu to validate the operation.
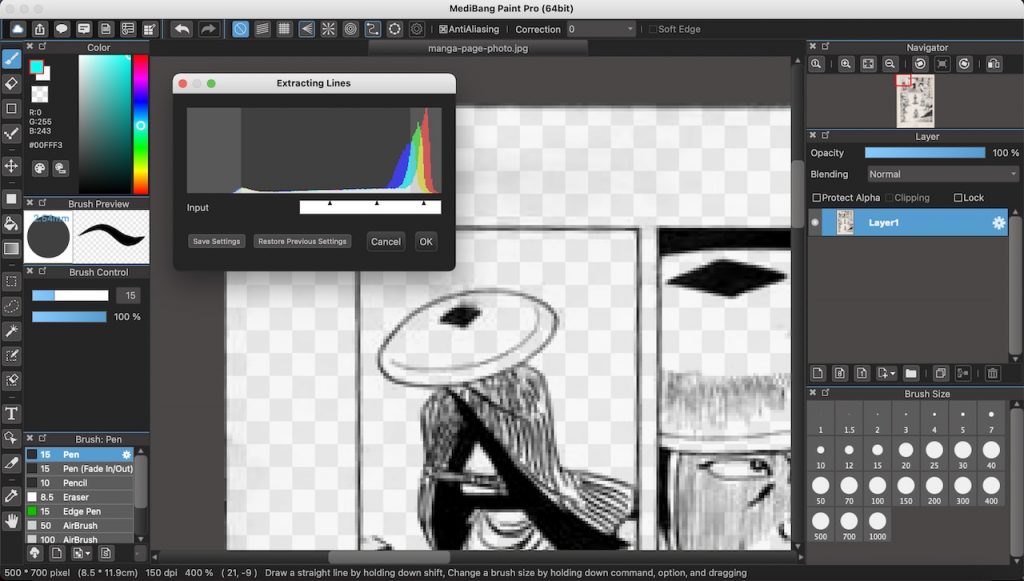
Making your image black and white
The best approach to make a picture black and white is to enhance the contrast of your image and to use a thresholding filter to separate blacks from white.Using MediBangPaint, the operation is simplified through the use of the line extraction tool. Here is how this tool can be used:
- Select the Filter > Extracting Lines… menu item.
- Move the left cursor to improve the darkness of the blacks, and the right cursor to remove lighter shades.
You will see that the process makes the page transparent. To correct this procede as follow:
- Select Layer > Add to create a new empty layer.
- Move the layer to the bottom by dragging the layer in the layer palette.
- Hide the layer containing your lines.
- Select the white colour, and select the Bucket tool.
- Click on your image to fill the new layer with the white colour
- Unhide the layer containing your lines
Now you should see your extracted lines on a white background.
Removing red / blue sketch lines
If you have used the non-photo blue / red pencil technique to draw your sketch, you will have blue or red sketch line showing under your inked drawing. These lines will be removed by filtering out the blue or red colour channel.
I didn’t find any fully efficient method to do this using MediBangPaint. You can try here also to use the menu item Filter > Extracting Lines… and try to remove the low contrast elements by moving the cursors at the bottom of the tool window (the right cursor).
If you can’t get rid of your sketch, though, a more efficient method can be to use another free tool, Gimp, which is a free image manipulation software available on Windows and MacOS.
Open your image in Gimp and then perform the following operations:
- Open the menu Colors > Components > Channel Mixer… and move the Blue in Red/Green/Blue channel cursors to the right if you have used a blue pencil, or the Red in Red/Green/Blue channel cursors to the right if you have used a red pencil. This operation get rid of any blue or red lines.
- You can then try to use the Colors > Threshold… menu item and move the position of the black cursor to reinforce your blacks.
On an Ipad, this operation can be achieved in Procreate using Adjustments > Gradient map > Layer menu. Then, create a new map using the + icon. And after that move the white cursor to a position that makes the undesired lines disappear.
If you are using Photoshop, you might also be able to use the Filter > Adjustments > Threshold filter.
Dust spots and undesired artefacts removal
Last step will be to remove any speck of dust and undesired artefacts (ink smudges, corrector outlines…) that might have appeared during the drawing or scanning process.
The operation is simple. Use the eraser tool or a pencil with a white colour and remove or paint over these spots and undesired elements.
Saving of your images
Once you are satisfied with your digitised manga page, save the result of your work. To avoid any loss of details, you have to select a format that will not degrade the content of your images. You should therefore use JPEG with maximum quality, or PNG (which is the format I use myself).
Your image is now ready. You can shade your image or colour it using dedicated software. You can also prepare the document for publishing online or on paper using the site of your choice.
Don’t forget to make copies of your digitised and shaded/coloured images. Some operations done on images can be irreversible, and you will be happy to have these backups if needed.
Here it is for this article. I hope this was instructional. Do not hesitate to comment and ask questions.
See you!
Stef