Free Procreate Gradient Screentone Brushes
Free Procreate Gradient Screentone Brushes
Here is a set of free gradient screentone brushes for Procreate. These brushes can be used to fill the background of your drawings or to texture characters and other elements.
Description of the Procreate brushes
There are 5 Procreate brushes with gradient screen tones having different density of dots. These different brushes allow for either large to small gradients, or to create gradients with more or less visible dots.
The brushes allow drawing gradients in any direction. And some of the brushes can even be used to shade slightly curved areas.
Finally, you can control the size of the brushes to adapt to the area to be covered.
Creating screentone gradients in Procreate
Even though I made my best to fine tune the brushes, their use will require some practice.
I would therefore strongly advise you to spend some time testing the brushes to understand how they work and how to control them.
This can seem complex at the beginning, but you will see that soon you will be able to create cool effects!
Basic usage
First, select the brush you wish to use. You can change the size of the gradient you wish to create by changing the size of the brush. As stated earlier on, this choices will influence the visibility of the dot structure of the screen tone.
Then, to create a gradient, you simply have to drag the brush over the area to be filled, and to hold down still the Apple Pencil at the end of the stroke. After a short time, Procreate should transform your stroke into a straight line. Procreate should also display a “Line created” prompt near the top center of the iPad screen.
If all went well, the gradient should look smooth and the spacing between the dots should be even. You should not see any dark or light banding. You can therefore lift up the apple pencil and tap anywhere on the screen, or on the pencil button, to end the stroke.
Correcting the spacing of the gradient screentone
If you can spot some gaps, you can control the spacing between the dots in two manners.
First, if you kept holding the Apple Pencil down at the end of your stroke after Procreate created a straight line, you can move the Apple Pencil to change the distance between the dots. You can use this technique to adapt the spacing to the desired distance.
If you have raised the Apple Pencil, or if you wish for finer control, the other option is to use the curve editor. After Procreate created a straight line, it should also have displayed an “Edit curve” button at the top center of the screen of you iPad. By tapping this button, Procreate will display two blue dots at the extremities of the line it created. You can drag these blue dots to change the distance between the dots.
Correcting the position of the gradient
Still in the curve editor mentioned above, you can move the whole gradient by dragging Apple Pencil. You can also adjust the position of either extremity of the gradient by moving the blue dot.
Once you are satisfied, you can then tap on the screen or on the pencil button to finalize the edition of the gradient.
I mistakenly quitted the curve editor!
This is something which happens quite often. And many times this is unexpected, like for instance when you manipulate the Apple Pencil and it suddenly switches tool.
Sadly Procreate doesn’t allow to edit a curve once it has been validated. If what remain is to move the curve, you can still do it using the Procreate edit tools (the S and mouse pointer buttons). But if you still need to adjust the screen tone, your only option is to undo the creation of the gradient (by using 2 fingers taps), and to start over again.
Changing the direction of the gradient screentone
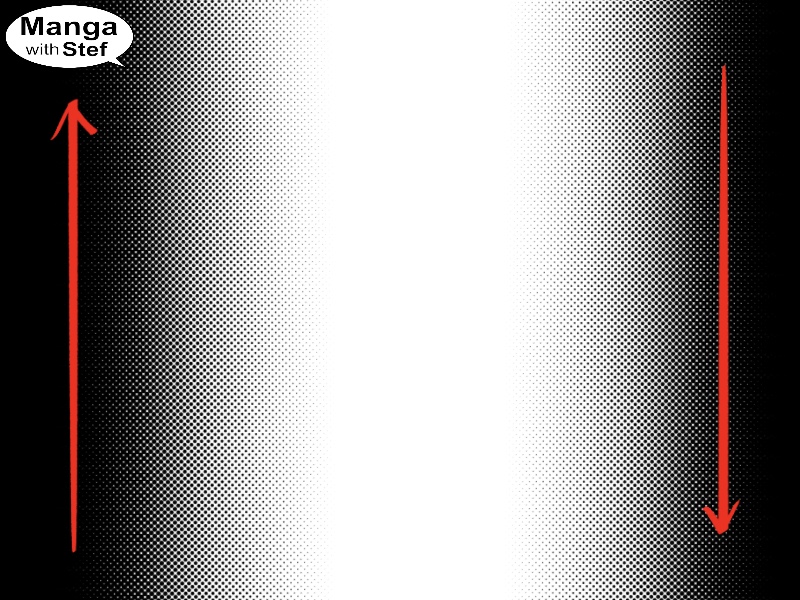
To change the direction of the gradient, it’s really easy. You simply have to change the direction in which you stroke the gradient.
Drawing from left to right will lead to having darker shades on top, and lighter ones at the bottom.
Drawing from right to left will lead to the opposite. Lighter shades will be on top and darker ones at the bottom.
And of course, this works for any direction.
Downloading the Procreate gradient screentone brushes
Time for you to enjoy the brushes!
To download a brush, click on the desired image below to access the download screen. Then click on the blue download button. The download will start once you will have solved the Captcha, and agreed to the terms of use.
Then, simply open the downloaded file with Procreate, and the brush will be installed in the Imported brushset at the bottom of the brushset list in the Brush Studio.
Black to white gradients


Do not hesitate to ask if you have any questions or comments. I will do my best to improve these brushes.
Note also that I have some more standard gradient screen tones available if you wish to use masking or erasing techniques.
Stef